Monday, January 19, 2009

Case Responsible Contact To Email and other Activities

A typical customer request is for email created from a Case to default to send to the Responsible Contact instead of its default behavior which is to send it to the Customer.

Since the Responsible Contact isn't even on the Case form by default and a customer could be a contact, MS chose this default behavior. However most of my installations to date have an Account as the Customer and one of many Contacts related to that Account as a Responsible Contact.

This is actually something very easy to change.

Please Note: This is an unsupported modification, and any patch could overwrite this.

There is a JavaScript file, cases.js, in the following folder.

C:\Program Files\Microsoft Dynamics CRM Server\CRMWeb\_static\CS\cases

It contains a function called locAddActTo that fills the To: activity party variables that are sent in the QueryString to the activity like the URL below.

http://crmserver1:5555/MicrosoftCRM/activities/email/edit.aspx?
pId={E0F2E676-7FE2-DD11-9AE8-0003FF517B20}
&pType=112
&pName=CaseTitleGoesHere
&partyid={0EDF3D7E-E3E0-DD11-A5F9-0003FF517B20}
&partytype=1
&partyname=AccountNameGoesHere
&partyaddressused=&contactInfo=

What we care about are the partyid, partytype and partyname arguments.

function locAddActTo(iActivityType, sContentId)
{
var sParentId   = null;
var sParentType = null;
var sPartyId   = null;
var sPartyType = null;
var sPartyName = null;
var sPartyLocation = null;


sParentId   = crmFormSubmit.crmFormSubmitId.value;
sParentType = crmFormSubmit.crmFormSubmitObjectType.value;


if (iActivityType != Task)
{
var customerId = crmForm.all.customerid.DataValue;
if (!IsNull(customerId))
{
if (!IsNull(customerId[0]))
{
sPartyId   = customerId[0].id;
sPartyType = customerId[0].type;
}
}
sPartyName = crmForm.customerid.parentElement.previousSibling.innerText;

sPartyLocation = "";
}

As you can see this information is being pulled from the case form customer field crmForm.all.customerid.DataValue

So all we have to do is change this to crmForm.all.responsiblecontactid.DataValue

and change the sPartyName assignment.

sPartyName = crmForm.customerid.parentElement.previousSibling.innerText;
to
sPartyName = customerId[0].name;

You can just replace the above function with the one below if you would like.

function locAddActTo(iActivityType, sContentId)
{
var sParentId   = null;
var sParentType = null;
var sPartyId   = null;
var sPartyType = null;
var sPartyName = null;
var sPartyLocation = null;


sParentId   = crmFormSubmit.crmFormSubmitId.value;
sParentType = crmFormSubmit.crmFormSubmitObjectType.value;


if (iActivityType != Task)
{
var customerId = crmForm.all.responsiblecontactid.DataValue;
if (!IsNull(customerId))
{
if (!IsNull(customerId[0]))
{
sPartyId   = customerId[0].id;
sPartyType = customerId[0].type;
sPartyName = customerId[0].name;
}
}


sPartyLocation = "";
}

After you have saved the change, run  iisreset to flush the cache.

That's it.

Sunday, January 18, 2009

CRM 4.0 Custom Workflows

Custom Workflows in MS CRM 4.0 are very simple to deploy and are pretty simple to create especially if you are familiar with Plugin-in development. 

Before you can create a workflow you need to have the Workflow Extensions installed. This is more of a concern if you are running VS2005. If you are running VS 2008 SP1, you should have everything you need already.

If you have an assembly that you are already deploying for plug-ins you can even add a workflow to that assembly so that you have fewer deployment assemblies.

The following custom workflow was created for a customer who wanted to have a matching customer sales relationship created for an account whenever an opportunity role was assigned to a contact.

namespace OneCRMPro { // In the workflow editor // "OneCRMPro" is going to show up at the bottom of the Add Step pick list // "Create CustomerRelationship" will show up as item off of OneCRMPro. [PersistOnClose] [CrmWorkflowActivity("Create CustomerRelationship", "OneCRMPro")] public partial class CreateCustomerRelationship : SequenceActivity { // These DependencyProperty entries will show up in the Set Properties editor public static DependencyProperty RoleProperty = DependencyProperty.Register("Role", typeof(Lookup), typeof(CreateCustomerRelationship)); [CrmInput("Sales Role")] [CrmReferenceTarget("relationshiprole")] public Lookup Role { get { return (Lookup)GetValue(RoleProperty); } set { SetValue(RoleProperty, value); } } public static DependencyProperty CustomerProperty = DependencyProperty.Register("Customer", typeof(Lookup), typeof(CreateCustomerRelationship)); [CrmInput("Customer Contact")] [CrmReferenceTarget("contact")] public Lookup Customer { get { return (Lookup)GetValue(CustomerProperty); } set { SetValue(CustomerProperty, value); } } // End Set Properties /// <summary> /// Execute is called when the custom workflow is invoked /// </summary> /// <param name="executionContext"></param> /// <returns></returns> protected override ActivityExecutionStatus Execute(ActivityExecutionContext executionContext) { //Get a workflow context var contextService = executionContext.GetService(typeof(IContextService)) as IContextService; var workflowContext = contextService.Context; CreateRole(workflowContext); return ActivityExecutionStatus.Closed; } /// <summary> /// Create a matching sales customer relationship role /// </summary> /// <param name="context"></param> private void CreateRole(IWorkflowContext context) { try { // Get Guids of Customer and RelationshipRole Guid contactId = Customer.Value; Guid salesRoleId = Role.Value; // get a local service ICrmService service = context.CreateCrmService(true); // Grab the contact involved var cols = new ColumnSet(new [] {"parentcustomerid"}); var thisContact = (contact)service.Retrieve(EntityName.contact.ToString(), contactId, cols); // Create a cooresponding customer relationship var role = new customerrelationship { customerid = thisContact.parentcustomerid, partnerid = CrmTypes.CreateCustomer(EntityName.contact.ToString(), contactId), partnerroleid = CrmTypes.CreateLookup(EntityName.relationshiprole.ToString(), salesRoleId) }; service.Create(role); } catch (SoapException) { // Handle error } catch (Exception) { // Handle error } } } }

Before you can use your workflow it needs to be strongly signed and registered.  Its assembly is registered in the same way as a plugin, but it doesn't require registering it at the entity or event level. If you don't have the plugin Registration Tool you can find it here. Plugin Deployment Tool

image

When you create a new Workflow you can now select this custom Workflow when you "Add Step" and pick the following at the bottom of the list.

OneCRMPro   >   Create CustomerRelationship

Now when you "Set Properties", you will see below how the DependencyProperty values will show up below.

The CrmInput keyword specifies the Property Name and the CrmReferenceTarget keyword specifies the expected attribute type to be mapped.

image

That's about it. Publish your workflow and try it out!

Saturday, December 20, 2008

MS CRM 4.0 Filtered Lookups

I just finished implementing a number of filtered lookups with Michael Höhne's Stunnware Filtered Lookup 4.0. Like most developers I have to think seriously about whether I want to build something vs. pay for someone else's work.

There has been a lot of work put into this product since its introduction with CRM 3.0. The 4.0 release seems pretty well sorted and really makes creating filtered lookups an easy task to accomplish. Supporting the Outlook client, multiple languages, multi-tenancy, and IFD makes this a much better solution then most(probably all) of us would take the time to build on our own.

Filtered Lookups have been reinvented far too many times and become maintenance issues for many upgrading from CRM 3.0 to CRM 4.0. I would rather not have to dig through another guy's failed attempt at this functionality in the future. I personally believe MS should pull this functionality into its product, but barring that, I think using a product like this is the best way to go.

I'm currently using it for a growing list of filtered Lookups for one my customers.  This includes some pretty standard lookups like the Account: Primary Contact Lookup, the Case: Responsible Contact, and the Email To:, CC:, and BCC: fields, as well as some for custom fields.

What is typically involved in making a filtered lookup with this tool is the following:

  1. Settings -> Filtered Lookup: Create a Retrieve Multiple Queries entity
    • This may involve using the Fetch Wizard to generate the query.
  2. Settings -> Filtered Lookup: Create a Single-View Lookup entity
  3. Settings -> Customizations: Add JavaScript to your entity's OnLoad event.

Here is a simple example:

I needed a filtered list for Reseller Accounts on an opportunity.
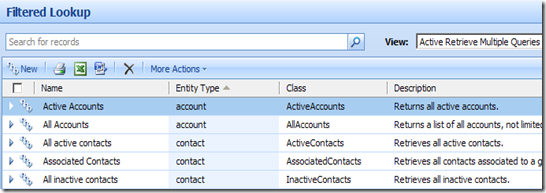
image

So I created a new Retrieve Multiple Query entity,image
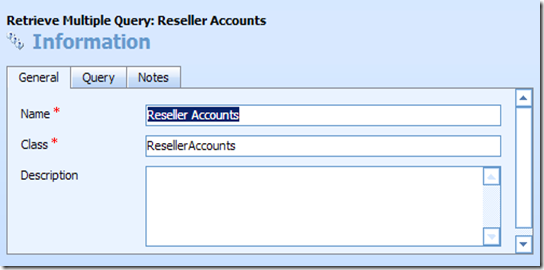
copied the Query from the Active Accounts example and added a filter for an industrycode picklist value of 21,image

created a Single-View Lookup using the Query above,image

setup the columns for that Lookup,image 

set the Labels to English,image

added this JavaScript to my Opportunity's OnLoad Event. Published the opportunity and I was done.

SW_IS_LICENSED_USER = false; try
{ var httpRequest = new ActiveXObject("Msxml2.XMLHTTP"); httpRequest.open("GET", prependOrgName("/isv/stunnware.com/cld4/cld4.aspx?orgname=" + ORG_UNIQUE_NAME), false); httpRequest.send(null); eval(httpRequest.responseText); } catch(e) { } if (SW_IS_LICENSED_USER) { var resellerAccountLookup = new SwSingleLookup("new_resellerid"); if (resellerAccountLookup.existsOnForm()) { resellerAccountLookup.setLookupClass("ResellerAccounts"); } }

All in all that took maybe 10 minutes including testing.

That was a very simple case. The examples in the help file show you how to create the Account: Primary Contact filtered lookup showing only Contacts associated with that Account. Implementing this only required cutting from the example and pasting into the OnLoad Event of the account form. Another example gave me the information I needed to to implement the Case Responsible Contacts Filter where the Filtered Lookup changes when the case's account is changed. This required a little JavaScript added to the OnChange for the customerid as well as the Onload for the form.

The email modifications I made were also very easy to implement as shown in the code that follows. Since the Account is almost always preloaded in the To: field, it was easy to overload the lookups for the target selections to default to the Contacts related to that Account.

SW_IS_LICENSED_USER = false;

try {
    var httpRequest = new ActiveXObject("Msxml2.XMLHTTP");
    httpRequest.open("GET", prependOrgName("/isv/stunnware.com/cld4/cld4.aspx?orgname=" + ORG_UNIQUE_NAME), false);
    httpRequest.send(null);
    eval(httpRequest.responseText);
}

catch(e) {
}

if (SW_IS_LICENSED_USER) 
{  
   if ( crmForm.all.to.DataValue != null )
   {
     var accountid =  crmForm.all.to.DataValue[0].id;
    
     var toContactLookup = new SwSingleLookup("to");
     toContactLookup.setParameter("parentcustomerid", accountid);
     toContactLookup.setLookupClass("AssociatedContacts");

     var ccContactLookup = new SwSingleLookup("cc");
     ccContactLookup.setParameter("parentcustomerid", accountid);
     ccContactLookup.setLookupClass("AssociatedContacts");

    var bccContactLookup = new SwSingleLookup("bcc");
    bccContactLookup.setParameter("parentcustomerid", accountid);
    bccContactLookup.setLookupClass("AssociatedContacts");
   }

}

For this instance I am still relying on the Form Assistant if the end user wants to select multiple Contacts for a single field or add a CRM user, which is a rare case for this customer. The Form Assistant is not modified by these lookups in any way.

Understanding 3 Important Lines of Code
There are three important lines of code to that you will use to create a filtered lookup.

1. Create a new lookup to override the existing lookup for specified field on the form. In this case the "to" field on the email form. 

      var toContactLookup = new SwSingleLookup("to");

2. Set a filter parameter that is defined in your Fetch and assign a value. 

      toContactLookup.setParameter("parentcustomerid", accountid);

Below is the Fetch that you can access under settings. Notice the parentcustomerid field in the filter section. You are not limited to a single parameter if you need additional criteria for your filter.

<fetch mapping="logical">
   <entity name="contact">
      <attribute name="emailaddress1" />
      <attribute name="telephone1" />
      <attribute name="fullname" />
      <order attribute="fullname" />
      <filter>
         <condition attribute="statecode" operator="eq" value="0" />
         <condition attribute="parentcustomerid" operator="eq" param="parentcustomerid" />
      </filter>
   </entity>
</fetch>


3. Set the class that you are using.  

     toContactLookup.setLookupClass("AssociatedContacts");

That's it, just save your customization and publish. You now have a working filtered Lookup.

Just the Beginning 
These are some very simple examples, but it is obvious how easily much more complex filters could be. If you are going to create complex Retrieve queries, it is worth downloading the Fetch Wizard as well, which is a really easy way to create the XML needed for the fetches that this tool relies on. The Fetch Wizard is part of the Stunnware Tools 4.0. that are available for download at no charge.

What you will see Under Settings-> Filtered Lookup are the following which will allow you to configure everything but the little bit of JavaScript that you will add to your forms, and there are even tools for tracing your filtered lookups if something isn't working quite right.image

This tool is made for a developer to use, but a person comfortable with customizing CRM and with some JavaScript experience should be able to get by. It requires an installation process that can require you to manually update the XML of your ISV.config and SiteMap, but if you read the instructions, it will all make sense.

If you are playing with the MS CRM 4.0 VPC Image, there is a license for that image that you can download at no cost to test this system out.

If you are considering reinventing this wheel, I seriously recommend trying this solution out first.

Monday, December 15, 2008

MS CRM 4.0 Plug-ins vs. CRM 3.0 Callouts

Plug-ins are a huge improvement over the callouts available in MS CRM 3.0. They are much more flexible, much easier to deploy, and have a many more triggers allowing a lot more access to the inner operation of your CRM system.

The following comparison shows some of the key differences:

Callout

Plug-in

Deployment

Requires Workflow service to be restarted to re-read the callout.config.xml which defines which assemblies and classes to call for each triggered event.

Requires assemblies be copied to each CRM server in your web server farm. Because those assemblies can be busy this can require:

  1. Draining each server in an NLB configuration.
  2. An IIS reset
  3. Stopping the Workflow service.
  • Allows deployment to the database in a single step for all CRM servers.
  • Or deployment to the GAC on each server.
  • Or deployment to a folder for debugging.


  • Requires a strongly typed assembly.

Flexibility

Requires a different interface for each Message. A PreCreate has a different interface from a PostCreate, or a PreUpdate, or a PostUpdate. Has the same interface for all messages.

Supports many more messages
Supported Messages for Plug-ins

  Has parent and child pipeline feature
  Has the ability to watch for endless loops.

Coding

Requires parsing Xml images to see the contents of the entity generating the message: preImageEntityXml, postImageEntityXml

Returns a Dynamic Entity or Moniker instead.

var entity = (DynamicEntity)context.InputParameters.Properties[ParameterName.Target];

var myMoniker = (Moniker)context.InputParameters.Properties[ParameterName.Target];

Allows validity checking and stopping a change to the database in a preCallout

errorMessage = "Validation Failed."; return PreCalloutReturnValue.Abort;
                

Allows validity checking and stopping an operation in a Pre message.

throw new InvalidPluginExecutionException(
"Validity Failed. {1}");

Allows modifying data before it is written to the database in a  preCallout.

Parse and Modify the entityXML               

Allows modifying data before it is written to the database in a Pre message.

Modify the Dynamic entity.

String nameProperty = entity.Properties["name"] as String;
nameProperty = "new name";


Resources

VS Plug-in template This template will create a basic Plug-in Project and is a good starting point.

  • The example it creates is for a Dynamic Entity Target. This is useful for Create and Update messages, but many other messages will return a Moniker which gives you the id of the calling entity.
  • The template includes code to call a customized crmservice which can be useful, although it is faster and a better practice to call your service from the context as shown below if you are comfortable with Dynamic Entities:

    ICrmService service = context.CreateCrmService(true);

Plugin Deployment Tool This tool will allow you a simple way to deploy your plug-ins. and has an easy to use UI.

With plug-ins it is important to learn about Dynamic Entities.

If you purchase David Yak's CRM as a Rapid Development Platform, it comes with a number of helper classes for Dynamic Entities, and plug-ins as well as other useful tools that are interesting. His chapters on plug-ins and dynamic entities are useful, and the code he provides is worth downloading and referring to. He also has chapters specific to using his plug-in framework for debugging and other tasks which are not CRM development generic.

I recently ordered a copy of Programming Microsoft Dynamics CRM 4.0, and I'll try to remember to update this post after I have looked over its coverage of Plug-ins and dynamic entities.

Wednesday, November 26, 2008

Interactive Webcast: The Top 5 Ways to Save Money with CRM

I've been invited back to be a guest speaker for an interactive Webcast on December 4th at 10:00 AM Pacific, 1:00 PM Eastern, 6:00PM GMT. This is through CBS interactive and Tech Republic.

http://webcasts.techrepublic.com.com/abstract.aspx?docid=390610&promo=100202

Thursday, November 20, 2008

Queues in MS CRM

There are a lot of misconceptions about queues. They only apply to cases and activities.  While the terminology is the same, assigning a case or activity to a queue is not the same as assigning an entity to a CRM user or team. Programmatically what is being used is a RouteRequest rather than an AssignRequest.

To get a better idea how this works we'll look at database. There are two entities storing queue information, the Queue and the QueueItem. These are not customizable.

Queue – (table) contains all queues

  • There are two queues automatically created for each CRM user. 
    • Assigned
    • In Progress
  • Any user defined queues that you create are also stored here.
    • example:  My New Public Queue

QueueItem – (link table)  Contains an entry for each entity assigned to a queue.

  • An item can only belong to one Queue at a time,
  • The only entities that can below to a Queue are:
    • Activities ( email, tasks, etc. )
    • Cases

An activity or case retains its owner and is not modified in any way when it is assigned to a queue. It is just added to the QueueItem list.  An entity can ONLY belong to one queue at a time.

Normal Lifecycle

When created a case or activity is added to the Assigned queue of the owner and it will stay there until it is completed/closed/canceled.

Sometimes a workflow will assign an entity to a user defined queue. (Below is an example that just puts all created Cases into a Support queue.) You might want logic with timers to move Cases around, or you might have different queues by subject, or related account territory. The important thing is that the queue is used as a natural part of the customer's business process.

image

When someone selects an entity in the queue and clicks  Accept... that entity it is then moved into that person's "In Progress" queue.

image

Example code working with Queues

Creating a Queue

var newQueue = new queue
{
    name = "My New Public Queue",
    businessunitid = new Lookup { Value = BusinessUnitId, type = EntityName.businessunit.ToString() },
    primaryuserid = new Lookup { Value = UserId, type = EntityName.systemuser.ToString() },
    queuetypecode = new Picklist { name = "Public", Value = 1 }
};

service.Create(newQueue);

Assigning an incident to a Queue

// Target the incident var target = new TargetQueuedIncident { EntityId = incidentId }; // Create a RouteRequest ( you would need to query for your Queue Id's ) var route = new RouteRequest { Target = target, RouteType = RouteType.Queue,
SourceQueueId = currentQueueId.Value EndpointId = finalQueueId, }; // Execute the route var routed = (RouteResponse)service.Execute(route);

Tracking Queue Assignment in a Plugin

One of the related improvements to MS CRM 4.0 is the inclusion of the Route Message for Plug-ins.  For example, you can now trigger based on a Case being routed to a queue even though the case entity is not modified in any way.

Your code can inspect the SourceQueueId to see what queue it is coming from and the EndpointId to see the destination queue.

This link shows a complete list of the Plug-in Message Input Parameters. You can see that the Route Message has 3 input parameters, two which I mentioned (SourceQueueId and EndpointId) as well as RouteType which has three values ( Auto = 0 ( automatic route) , User = 1 (route to a user's private queue), Queue =  2 (route to a public queue) ) You could use the RouteType to filter out a chunk of queue routes that wish to ignore.

The fact that the dynamic entity of an incident contains no information about the queue it is assigned to means that you need to examine the context.InputParameters.Properties to find out which queue the case is coming from and which queue it will finally call home.

public void Execute(IPluginExecutionContext context)
   {
      DynamicEntity entity = null;

    if (context.InputParameters.Properties.Contains(ParameterName.Target) &&
       context.InputParameters.Properties[ParameterName.Target] is DynamicEntity)
    {
        entity = (DynamicEntity)context.InputParameters.Properties[ParameterName.Target];
        
        if (entity.Name != EntityName.incident.ToString()) { return; }
        if (context.MessageName != MessageName.Route.ToString()) { return; }
        
        Guid SourceQueueId = ((Moniker)context.InputParameters.Properties["SourceQueueId"]).Id;
        Guid EndpointId = ((Moniker)context.InputParameters.Properties["EndpointId"]).Id;
    }

Wednesday, November 19, 2008

A Couple Data import issues

I thought these items might be of help to other people populating data in MS CRM systems. The first is documented, but for the second I found no information on web.

Issue 1: When importing email activities, like all other activities in the vast majority of instances you need to complete them so they show up in history and not in the current Activities of a user's Workplace or against the items to which they are regarded.

If you import an email message with a From email address that is not a CRM system user, you can create the activity without a problem, but will get a Soap Exception "The specified sender type is not supported." When you try to set the state of the email to "Received". The following hot fix will allow you to Complete those incoming emails and set them to "Received".

http://support.microsoft.com/kb/947860/en-us

Issue 2:  While importing account information after a customer of mine added additional customertypecode picklist items I ran into a Soap Exception.

<code>0x8004431a</code>
<description>A validation error occurred.  The value of 'customertypecode' on record of type 'account' is outside the valid range.</description>

The customertypecode picklist starts at 1 and progresses linearly with the default values out of the box, and you can always rename the existing items, but any new picklist items start with values of 200001 and progress linearly from there.

Workaround: Edit an existing account or add a dummy account and select a new pick list item with a higher ranged value and save that account record. Now the problem magically disappears.

Hypothesis: I'm thinking that the CRM webservices are using reflection like Excel does on a spreadsheet column but against the database and it initially ranges the pick list field as a short, but only ranges it up when a larger value exists.

If anyone has a better understanding of why this behavior occurs, I would love to hear about it.